How To Achieve and Maintain a Sleek Bun For 4c Afro Hair in The Summer Heat
Considering we are now in the midst of the summer months with some days reaching over 30C, many of us coily-headed girls are looking for an efficient way to achieve and maintain a sleek Afro hair bun. One that could look cute and classy whilst resisting the very present UK humidity.
Whether you’re enjoying the festival season, attending graduation, or starting your first day at a new job, a sleek Afro hair bun will add that special touch to your look.
What is a hair bun?
A hair bun is a form of protective hairstyle which involves the tucking away of hair into a ponytail. They can be loose or more fitted and slicked. They can also often aid in preserving your natural hair for a few days longer before wash day as the hair appears fresh-looking.
What types of Afro hair buns exist?
There are many variants when it comes to creating buns for 4c natural hair.
These include:
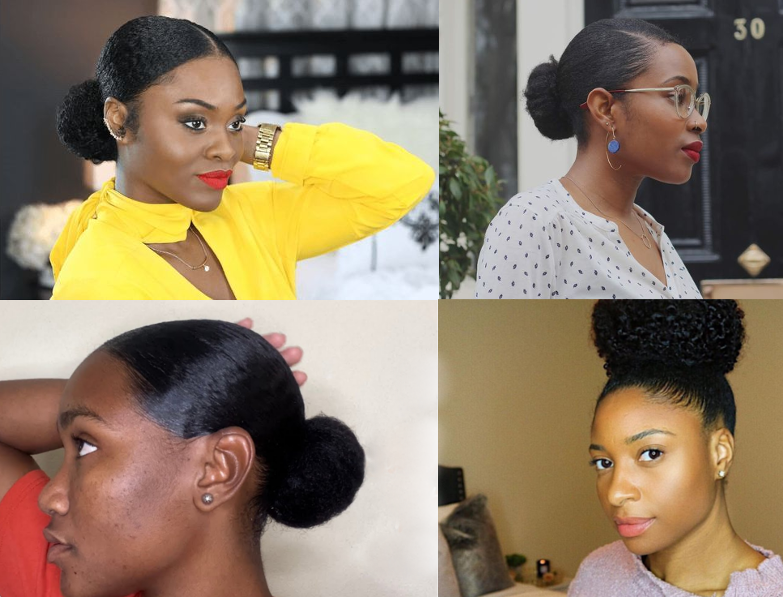
- Low bun
- High bun
- Mid bun
- Bun with slicked-down baby hairs
- Bun with added extensions
- Middle-part bun
- Side-part bun
- No parting bun
- And many more!
What is needed to achieve and maintain the perfectly slicked Afro hair bun?
When deciding what is needed to achieve the perfect slicked back Afro hair bun, the main things to have to use include:
- Hair Gel – I like the Shine ’n Jam, Black Castor & Flaxseed Oil styler because there is no alcohol or parabens, reducing hair dryness and flakiness.
- Edge control (optional) – If wanting to add baby hair to your hairstyle, edge control is a go-to! Got2b ultra glued styling gel is a great option that helps a lot with maintaining your cute baby hairs!
- Hair spray (optional) – I personally do not use holding spray because I prefer my hair not to get hard, however for those hot and humid days, a little bit of a good holding spray goes a long way in reducing flyaways.
- Silk/ Satin Scarf – This will be needed to set the hair in place and lay the edges down.
- Tangle teezer (optional) – This will help to distribute the gel and product through the hair, allowing for a more sleek look.
- Hard Bristle brush – This is the primary hair tool you will be using to slick the hair down.
- Hair edge control brush (optional) – For additional slicked baby hair, an edge control brush will be useful to achieve this (an unused toothbrush can be a quick alternative).
- Rat tail comb (optional) – If you want to add a part to your bun, some sort of comb that you can use to divide the hair will be needed to accomplish a clean part. The comb will also be useful if you do not want to use your hands to section your hair.
- Hair band – This is a must and hopefully an obvious one! It will be quite hard to attain a bun without a hair band to pack the hair together into a ponytail.
How do you achieve a sleek Afro hair bun?
As a 4c hair girl myself, achieving and maintaining a slicked back Afro hair bun for the summer heat looks a bit different compared to those with looser coils. Through practice and seeking advice from other 4c ladies, I have devised a generalised, yet specialised, 11-step guide to achieving and maintaining a slicked Afro hair bun.
11 Steps to follow to achieve a slicked hair bun.
- Whether your hair is freshly washed or a few days old, make sure it is moisturised! We do not want to be manipulating our hair whilst it is dry as it can cause unnecessary breakage.
- Use a rat tail comb or your hands to section off a medium size portion of the hair at the back (aka your first section of focus)
- Apply a generous amount of styling gel to your hair.
- Use your tangle teezer to help evenly distribute the product throughout the hair. Remember this is optional. If you prefer, you can skip this step and just use a hard bristle brush to smooth down the section of hair.
- Once the previous step is completed, secure the section with a hair band.
- Assuming you want a bun with a part, repeat steps 2-5 until you have reached the front section of your hair. However, instead of adding on a hair for each section, simply remove the hair band and secure it again with the new section of hair that you will be adding to the bun.
- Once at the front of your hair, use your rat tail comb again to create your parting of choice (side, middle parting, or whatever you want).
- Having created a part, you should have 2 sections left. For the last 2 sections, repeat steps 2-5 and you have achieved the bun!
- For some optional extra styling, use your hair edge control brush and some edge control to lay down your edges to create some cute baby hairs. PRO TIP – Let the edge control get a bit tacky for a few seconds to a minute before using the edge control brush to aid in keeping the edges laid for longer.
- Tie your hair down with a silk/satin scarf and leave it on for at least 30 minutes. I personally like to leave mine on for a few hours whilst I get ready. If I want to be extra slicked for a special event, I leave it on overnight and lay my edges and baby hairs in the morning.
- For extra security and to keep them flyaways away, spray got2b holding spray lightly over your bun.
And voilà! There you have your sleek Afro hair bun, ready to take on the day!
How does to maintain a sleek Afro hair bun?
Having followed the steps to achieving a sleek Afro hair bun, maintaining the hairstyle is quite simple.

Top tips maintaining a sleek Afro bun:
- If you are wearing the style for a couple of days and use got2b edge control, I would advise you to apply some water at the end of the day to remove the gel before sleeping. This will help prevent waking up to potentially flaky and dry edges. I then like to apply some oil to seal in the moisture.
- Sleep with a silk/ satin scarf to maintain the bun for a few days.
- In the morning your hair should be laid so you can simply leave it like that or style your edges again as you please.
- If you are woken up by a messy bun, feel free to add some more gel and smooth it down with your fingers. Tie it down with a scarf again for 30mins for it to set back into place again.
- A bun that is braided at the end and not tucked will last longer, so if wanting to preserve the style longer, the former is a better option.
- For any flyaways or short pieces of hair that still will not lay, a few bobby pins here and there should help.
- As much as we would love a perfectly slicked bun, ensuring your bun is not too tight is essential to reduce tension and manipulation as a sore scalp will lead to you having to readjust your bun.
I hope you found this post educational and helpful in allowing you to achieve and maintain your sleek Afro hair bun for the summer heat. For more information regarding all things Afro hair, check out hair and beauty blog posts on FroHub and you can also find and book Afro hairdressers near you.
You may also be interested in